从零开始搭建一个 Vue + TypeScript 的 Webpack 项目
文章末尾有快速创建步骤,点击前往🔗
项目创建
安装TypeScript环境
首先在系统中和项目中安装相关环境依赖(TS):
1 | npm i typescript -g |
创建Webpack项目
接下来在搭建项目的目录下打开终端,使用命令初始化构建一个Webpack项空项目:
1 | npm init -y |
然后为项目配置webpack和cli及Vue:
1 | npm i -D webpack |
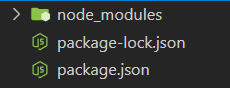
package.json为Node.js项目的声明文件,声明了模块依赖、脚本定义和版本名称等内容
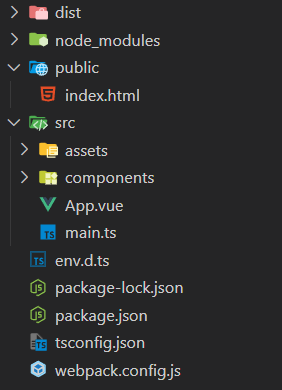
在项目中创建配置文件和Vue项目文件
dist为Vue代码的编译结果目录,最后的编译结果都是前端静态资源文件,例如JavaScript、CSS和HTML等文件public为存放index.html挂载Vue节点页面的目录src为项目的源码目录,主要开发的代码内容都放在这个文件夹里src/main.ts为项目入口文件env.d.ts为TypeScript的.vue声明文件webpack.config.js为Webpack配置文件
再使用如下命令创建ts配置文件tsconfig.json:
1 | tsc --init |
项目配置
main.ts配置
在入口文件src/main.ts中写入如下内容:
1 | import { createApp } from "vue"; |
App.vue搭建
1 | <template> |
index.html挂载
1 |
|
配置TS的vue声明文件
在env.d.ts中写入如下内容,帮助ts认识vue文件:
1 | declare module "*.vue" { |
Loader配置
安装Vue使用相关loader:
1 | npm i -D vue-loader css-loader style-loader ts-loader |
Plugin配置
webpack并非会将HTML文件一并在dist中分离,可以添加如下plugin分离HTML:
1 | npm i -D html-webpack-plugin |
DevServer可以监听文件的变化并自动刷新网页,做到实时预览,使用如下命令安装:
1 | npm i -D webpack-dev-server |
安装每次打包自动删除旧文件组件:
1 | npm i -D clean-webpack-plugin |
webpack.config.js配置文件
在webpack.config.js文件中写入如下内容:
1 | const path = require('path'); |
添加运行命令
1 | "scripts": { |
项目运行
- 打包:
webpack/npm run build - 运行DevServer:
npm run dev
更多可配置
CSS分离
在配置完CSS-Loader后,webpack会将css封装在js文件中,如果希望将css文件分离,可以安装如下plugin:
1 | npm i -D mini-css-extract-plugin |
接下来在配置文件中添加:
1 | const MiniCssExtractPlugin = require("mini-css-extract-plugin"); |
接下来调整Loader部分如下:
1 | module: { |
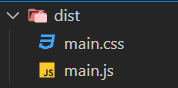
然后CSS文件就会分离出来
CSS压缩
如果希望将CSS文件压缩,可以安装如下plugin:
1 | npm i -D css-minimizer-webpack-plugin |
如果webpack版本为v4,则使用如下plugin替代:
在配置文件中添加如下内容:
1 | const cssMinimizer = require("css-minimizer-webpack-plugin"); |
然后在plugins下增加如下内容:
1 | new cssMinimizer() |
此时再启动webpack可以发现css文件被完成压缩。
配置Entry入口
在配置文件中可以配置项目的入口,可以添加如下内容:
1 | entry: { |
Babel兼容低版本ES语法
Babel是JavaScript编译器,有了它就可以使用下一代版本的JavaScript。安装babel相关依赖使用如下命令:
1 | npm i -D @babel/core |
在项目根目录下,创建.babelrc文件然后,将这些规则加入.babelrc.
1 | { |
再添加模块规则如下:
1 | { |
接下来再使用webpack就可以为ES6以上语法适配低版本。
快速创建步骤
环境配置
1 | npm i typescript -g |
项目创建
创建项目结构如下
-
创建
dist、src、public -
在
src下创建assets、components文件夹 -
创建
src/main.ts1
2
3
4
5import { createApp } from "vue";
import App from "./App.vue";
const app = createApp(App as any);
app.mount("#app"); -
创建
src/App.vue1
2
3
4
5
6
7
8
9
10
11
12
13<template>
</template>
<script lang="ts" setup name="App">
import { ref, reactive } from 'vue';
</script>
<style scoped>
</style> -
创建
public/index.html1
2
3
4
5
6
7
8
9
10
11
12
13
14
<html lang="en">
<head>
<meta charset="UTF-8">
<title>webpack demo</title>
<script src="https://unpkg.com/vue@3"></script>
</head>
<body>
<div id="app"></div>
</body>
</html> -
创建
env.d.ts1
2
3
4
5declare module "*.vue" {
import { DefineComponent } from "vue";
const component: DefineComponent<{}, {}, any>;
export default component;
} -
创建
.babelrc1
2
3
4
5
6{
"presets": [
"@babel/env"
],
"plugins": []
}
项目配置
-
修改
package.json中scripts如下:1
2
3
4"scripts": {
"build": "webpack",
"dev": "webpack-dev-server"
}, -
创建
webpack.config.js,写入如下内容:1
2
3
4
5
6
7
8
9
10
11
12
13
14
15
16
17
18
19
20
21
22
23
24
25
26
27
28
29
30
31
32
33
34
35
36
37
38
39
40
41
42
43
44
45
46
47
48
49
50
51
52
53
54
55
56
57
58
59
60
61
62
63
64
65
66
67
68
69
70
71
72
73
74
75
76
77
78const path = require('path');
const htmlWebpackPlugin = require('html-webpack-plugin');
const { VueLoaderPlugin } = require('vue-loader/dist/index');
const { CleanWebpackPlugin } = require('clean-webpack-plugin');
const { Configuration } = require('webpack');
const MiniCssExtractPlugin = require("mini-css-extract-plugin");
const cssMinimizer = require("css-minimizer-webpack-plugin");
/**
* @type { Configuration }
*/
module.exports = {
// 可选模式: development / production
mode: 'development',
entry: './src/main.ts',
output: {
filename: '[name].js',
path: path.resolve(__dirname, './dist'),
},
module: {
rules: [
{
test: /\.vue$/,
use: 'vue-loader'
},
{
test: /\.css$/,
use: [
{
loader: MiniCssExtractPlugin.loader
},
"css-loader"
]
},
{
test: /\.ts$/,
loader: "ts-loader",
exclude: /node_modules/,
options: {
appendTsSuffixTo: [/\.vue$/]
},
},
{
    test: /\.js$/,
    use: ['babel-loader'],
    include: path.resolve(__dirname, 'src')
},
]
},
plugins: [
new htmlWebpackPlugin({
template: './public/index.html'
}),
new VueLoaderPlugin(),
new CleanWebpackPlugin(),
new MiniCssExtractPlugin({
filename: "main.css",
chunkFilename: "[id].css"
}),
new cssMinimizer()
],
devServer: {
compress: true,
port: 8000,
hot: true,
open: true,
},
resolve: {
alias: {
"@": path.resolve(__dirname, './src')
},
extensions: ['.vue', '.ts', '.js', '.json']
},
externals: {
vue: 'Vue'
},
// stats: "errors-only",
};